

TIG Settings Explained (Part 2)
- N. Ferro
- Apr 18, 2020
- 5 min read
In part 1 of the TIG Settings Explained series we covered Post Flow, Pulse and 2T vs 4T.
Today we're going to cover some additional settings which may seem a bit confusing at first, but I promise they're more straightforward than you think. We're going to be talking about Alternating Current (abbreviated AC), AC Balance, AC Frequency.
ALTERNATING CURRENT & AC FREQUENCY
Let's begin with the feature which separates entry level TIG welding machines from higher end machines, Alternating Current (AC).
This feature can usually add between $500-1000USD to the price of a machine versus a Direct Current (DC) only machine. We're going to put Alternating Current and AC Frequency in the same section because it's almost impossible to discuss one without discussing the other.
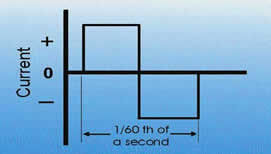
Here's the short and sweet version. AC alternates back and forth between straight polarity and reverse polarity multiple times per second. When you're adjusting your AC Frequency, you're adjusting how many cycles per second the machine will do. This is measured in Hertz (Hz). 60Hz means the machine is alternating between straight polarity (electrode negative) and reverse polarity (electrode positive) 60 times per second as shown in the graphic below. 120hz would be 120 times per second.
If you're like I was when I first learned about this, you're probably thinking "that makes sense, but WHY do I need the machine to do that? Isn't TIG welding usually done on straight polarity?" The answer is yes...for steel. If you're TIG welding steel you'll be using straight polarity (electrode negative) exclusively, but for aluminum you need alternating current, here's why.
When aluminum is exposed to air, it forms an oxide layer on the surface in much the same way copper will form a greenish oxide layer when exposed to the elements. This aluminum oxide layer melts at a much higher temperature, 3600 degrees Fahrenheit while the aluminum itself melts at just 1200 degrees. If those oxides aren't burned off, they'll muddy up the weld puddle and produce a poor quality weld, so how does AC solve the problem?

The electrode positive portion of the AC cycle provides a natural cleaning action. During this electrode positive cycle where the current flows from the work piece to the electrode (in this case the TIG torch), those oxides are blasted off the work piece exposing the aluminum below them. The electrode negative portion of the cycle then melts the exposed aluminum and forms a useable weld puddle. This is why you cannot weld aluminum without alternating current. In the photos above and below, you will see a white haze around the weld. This is called "cathodic etching." I've included these photos as examples because they show the cleaning action that happens on electrode positive. That white haze is the oxide layer burning off of the aluminum. You will always have that haze on aluminum but it can be reduced by using a smaller cup and reducing the time spent on electrode positive, but more on that later.

Older welding machines were typically hard set at 60Hz, but we're living in the golden age of TIG welding where even entry level machines have tons of options including adjustable Frequency. Most modern machines recommend starting at 120Hz. Increasing your AC Frequency will give you a tighter more controlled puddle because it means the machine is spending less time on each end of the cycle which prevents the puddle from expanding out. The tradeoff here is that it also means less penetration into the weld joint. You'll have to play around with this setting to find the setting best suited to your application, but as mentioned above 120Hz is a good place to start. Go down to 60Hz for thicker structural joints. If you've got a specific application you want to ask me about just drop me a line in the contact section and we can figure it out.
AC BALANCE
Now that we've covered AC Frequency we can more easily discuss AC Balance.
To put it simply, while AC Frequency adjusts how many times the machine switches between electrode positive and electrode negative, AC Balance adjusts what percentage of time the machine spends on either portion. Sounds confusing right? But take a look at the graphic from Miller below and you'll see what I mean.

Looking at the yellow and green bar chart on the left side of the graphic we can see what we're talking about here. At the top you see an AC balance setting of 75. This means that for each cycle, the machine is spending 75% of the time on electrode negative and the remaining 25% on electrode positive. Below that chart you can see an AC balance of 50 where the machine is spending 50% of the cycle on electrode negative and 50% on electrode positive.
As we discussed above in AC frequency, we know that the cleaning action happens on electrode positive, this is where the aluminum oxides are blasted off the piece. If I was working on a dirty piece of aluminum like a porous cast part on a motor which is likely to have residual oil in it, I would want to increase the amount of time the machine spends on the electrode positive portion of the cycle because it's going to clean the piece more and produce a cleaner puddle.
I like to give suggestions for those getting started so when you are first playing with this setting begin with at 75% electrode negative. If you noticed, I'm not saying "set the machine at 75" and the reason I say that is because one unfortunate side effect of making machines in a variety of countries is that we don't all use the same measuring systems.
While American made machines like those you'll see from Miller and Lincoln measure AC Balance as the percent of time on electrode negative, some import machines AC Balance is actually adjusting the time spent on electrode positive! So be sure to read your manual to determine what your machine uses or you might be left scratching your head wondering why 75 is producing terrible welds. 75% electrode negative is where you want to start. If the piece is dirty or cast aluminum, bump this down to 60% or so, maybe even 50%. Very rarely do I go below 50% for anything.
I hope this section helps to explain some of what these settings do and WHY having these features matters when you're trying to dial in a welding process or work on something which requires more attention to detail.
As always, if there's something I missed or something you feel ought to be added to this article, drop me a line and I can include it.


Comments